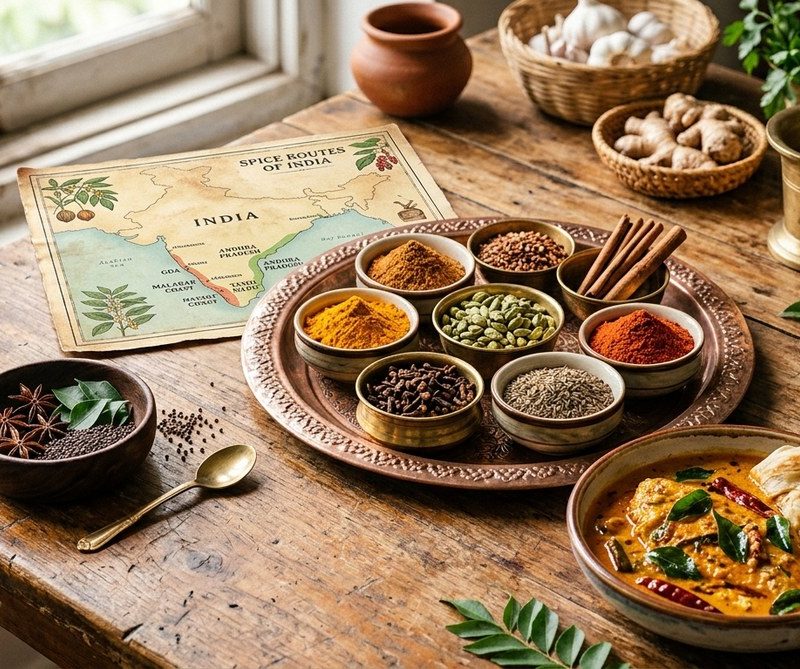
Blog

  • 48 Hours of Street Food Paradise: Your Ultimate Bangkok Eating Guide

    Bangkok doesn’t wait for anyone. The city wakes up sizzling, frying, and steaming before dawn, and the best meals happen where plastic stools meet cracked pavement. You’ve got 48 hours to eat your way through one of the world’s greatest street food capitals, and every minute counts. This isn’t about checking boxes at TripAdvisor’s top ten. This is about finding the noodle cart that’s been in the same family for three generations, the curry stall that locals line up for at 6 AM, and the grilled skewers that taste better at midnight than anywhere else on earth.

    Key Takeaway

    This 48 hour foodie guide Bangkok covers two full days of authentic street food experiences, from morning markets to late-night vendors. You’ll learn where locals actually eat, how to navigate food stalls confidently, which neighborhoods offer the best variety, and practical timing strategies to maximize your eating adventure without tourist markup or generic menus.

    Day One Morning: Markets and Morning Vendors

    Start at Or Tor Kor Market by 7 AM. This isn’t the backpacker market. This is where Bangkok chefs shop for ingredients and grab breakfast before service starts.

    The prepared food section on the second floor opens early. Look for khao tom, a rice soup that’s gentler than congee but more flavorful. Vendors simmer it overnight with pork bones, ginger, and garlic. You customize it with crispy garlic, white pepper, and Thai celery.

    Next to the rice soup stalls, find the curry vendors. They set out ten different curries in metal trays, each one darker, redder, or greener than the last. Point at what looks good. They’ll ladle it over rice and add pickled vegetables on the side. The massaman here tastes different from the coconut-heavy tourist version. It’s darker, with tamarind and roasted spices doing more work than cream.

    Walk through the produce aisles. You’ll see fruits you can’t name and vegetables that look like props from science fiction. This context matters. Understanding why we eat what we eat: the fascinating geography behind regional ingredients helps you appreciate why Thai basil differs from Italian, or why these tiny eggplants show up in every curry.

    Street Breakfast Essentials

    After the market, grab a taxi to Ari neighborhood. Between 8 and 10 AM, the soi (side streets) fill with office workers buying breakfast from carts.

    Pa tong go, the Thai version of Chinese fried dough, gets dunked in pandan custard or eaten with Thai iced tea. The dough should be crispy outside, pillowy inside, still warm from the oil.

    Jok (rice porridge) vendors set up with their toppings in small bowls: minced pork, century egg, ginger strips, and fried garlic. The texture lands somewhere between oatmeal and risotto. Locals eat it when they’re hungover, sick, or just want something warm and easy.

    Mid-Morning Strategy: Navigating Like a Local

    Between 10 AM and noon, most street vendors take a break. This is your window to walk off breakfast and scout locations for lunch.

    Here’s how to identify good street food:

    • Long lines of locals, especially during off-peak hours
    • Vendors who specialize in one or two dishes maximum
    • Fresh ingredients visible and being prepped continuously
    • Older vendors who’ve clearly been doing this for decades
    • Price consistency (same dish costs the same at different times)

    The plastic stool test matters. If Thai people in office clothes are sitting on tiny stools eating lunch, the food is legitimate. If the seating area only has tourists taking photos, keep walking.

    Day One Lunch: Chinatown’s Afternoon Rush

    Yaowarat Road, Bangkok’s Chinatown, transforms at lunch. Get there by 11:30 AM before the full rush hits.

    Nai Mong Hoi Thod makes oyster omelets that locals have been eating since 1969. The technique requires high heat and perfect timing. Eggs hit the flat top, oysters go in immediately, then tapioca starch creates that signature crispy-chewy texture. They serve it with sriracha and a vinegar-based sauce.

    Two streets over, find Jek Pui curry over rice. They open at 11 AM and sell out by 2 PM. The stewed pork leg curry tastes sweet, savory, and slightly medicinal from Chinese five-spice. It comes with hard-boiled eggs that have simmered in the sauce until they turn brown.

    For dessert, hit a traditional Thai sweets cart. Look for:

    1. Khanom krok (coconut rice pancakes cooked in a special pan with half-sphere molds)
    2. Tub tim grob (water chestnuts in coconut milk with crushed ice)
    3. Mango sticky rice (but only if mangoes are in season, March through May)

    Afternoon Break: Understanding Thai Food Fundamentals

    Thai cooking balances four flavors: sweet, sour, salty, and spicy. Every dish aims for harmony between these elements.

    Street vendors master this balance through years of repetition. The som tam (papaya salad) lady adjusts lime, fish sauce, palm sugar, and chilies by instinct. She tastes, adjusts, tastes again. This is why the same dish tastes different at every cart.

    Flavor Element Common Ingredients When to Add More
    Sweet Palm sugar, coconut milk If dish tastes too sour or salty
    Sour Lime juice, tamarind If dish tastes flat or too rich
    Salty Fish sauce, shrimp paste If flavors don’t pop enough
    Spicy Fresh chilies, dried chilies Personal preference, always adjustable

    Understanding these fundamentals helps you communicate with vendors. Point at the palm sugar if you want it sweeter. Gesture less with the chilies if you’re not ready for full heat.

    Day One Evening: Ratchawat Market After Dark

    Ratchawat Market, also called Train Market, sits next to active train tracks. Vendors set up inches from the rails. When trains come through (rarely, but it happens), everyone pulls their tables back two feet.

    Arrive around 6 PM when vendors finish setup. The market specializes in grilled items and northeastern Thai food (Isaan cuisine).

    Gai yang (grilled chicken) gets marinated in garlic, coriander root, white pepper, and fish sauce, then grilled over charcoal. The skin turns dark and crispy. They serve it with sticky rice in a woven bamboo basket and som tam on the side.

    Larb, a minced meat salad, represents Isaan cooking at its most essential. Ground pork gets tossed with toasted rice powder, lime juice, fish sauce, shallots, mint, and enough chilies to make your scalp sweat. It’s not subtle. It’s not supposed to be.

    “Street food isn’t about perfection. It’s about consistency and soul. The vendor who makes the same dish 200 times a day develops muscle memory that no recipe can teach. Trust the process, trust the crowd, and trust your appetite.” — Bangkok food tour guide with 15 years experience

    Late Night Day One: Sukhumvit Soi 38

    Sukhumvit Soi 38 night market runs from 8 PM until 2 AM. This strip of vendors caters to both locals heading home from work and night owls starting their evening.

    The pad thai here costs more than daytime carts (60 baht versus 40), but it’s made to order in individual woks. Watch the vendor work. Rice noodles hit smoking hot oil. Dried shrimp, tofu, egg, and tamarind sauce go in. The wok never stops moving. Noodles char slightly at the edges. That’s the goal. Perfectly smooth pad thai means the heat wasn’t high enough.

    Boat noodles (kuay teaw rua) get their name from vendors who used to sell them from boats on canals. Now they come from carts, but the portions stay small. Order three or four bowls. Each one costs 15 to 20 baht. The broth is dark, almost black, from beef blood and spices. Some people love it immediately. Others need a few bowls to adjust.

    End the night with roti. Indian-influenced flatbread gets fried on a griddle, then topped with condensed milk and sugar, or stuffed with banana and Nutella. It’s sweet, crispy, and exactly what you want at midnight.

    Day Two Morning: Victory Monument Breakfast Circuit

    Victory Monument has a breakfast culture that starts at 5 AM. Get there by 7 AM for the full selection.

    Khao mun gai (Hainanese chicken rice) vendors cluster near the BTS station. The dish seems simple: poached chicken, rice cooked in chicken fat, a small bowl of soup, and sauce. But the sauce makes it work. Fermented soybeans, ginger, garlic, Thai chilies, and vinegar create something funky, spicy, and bright.

    Two blocks south, find the jok vendors. This is different from the Ari version. Victory Monument jok comes with crispy wonton strips, century egg, and a raw egg cracked on top that cooks from the porridge heat.

    Ba mii vendors sell egg noodles with wontons, roasted pork, and greens. The noodles should be springy, almost bouncy. Overcooked ba mii turns mushy and sad.

    Day Two Mid-Morning: Cooking Terminology You’ll Hear

    Street vendors use specific Thai cooking terms. Learning a few helps you order better:

    • Pad: Stir-fried (pad krapow, pad see ew, pad thai)
    • Tom: Boiled or soup-based (tom yum, tom kha)
    • Yam: Salad, usually spicy and sour (yam woon sen, yam pla duk foo)
    • Gaeng: Curry (gaeng keow wan, gaeng phed)
    • Moo: Pork
    • Gai: Chicken
    • Pla: Fish
    • Goong: Shrimp

    When ordering, you can modify spice level:

    • Mai pet: Not spicy
    • Pet nit noi: A little spicy
    • Pet maak: Very spicy

    Most vendors appreciate when tourists try Thai phrases, even badly pronounced ones.

    Day Two Lunch: Thonglor Hidden Gems

    Thonglor seems too upscale for street food, but the sois hide excellent vendors who serve the construction workers and delivery drivers.

    Look for khao gaeng (curry over rice) stalls. They display eight to twelve curries in metal trays. No English menus. Just point. Try the green curry with chicken, the pork belly with Chinese broccoli, or the fish stomach curry if you’re feeling brave. Some dishes might remind you of 7 bizarre delicacies that will test your culinary courage, but most are approachable even for cautious eaters.

    Sai oua, northern Thai sausage, appears at specialty vendors. The sausage contains pork, lemongrass, kaffir lime leaves, galangal, and chilies. It’s herbaceous in a way that Italian or German sausage never attempts.

    Afternoon Strategy: Common Street Food Mistakes

    Even experienced travelers make these errors:

    Mistake Why It Happens How to Avoid It
    Eating only pad thai It’s familiar and safe Branch out to less known dishes
    Skipping vendors without English Seems too difficult Use pointing and Google Translate
    Ordering multiple dishes at once Restaurant habit Street food is meant to be eaten fresh, order one at a time
    Avoiding vendors that look “too local” Fear of getting sick Busy vendors with high turnover have fresher ingredients
    Not carrying small bills Assume vendors have change Break large bills at 7-Eleven before eating

    The “too local” fear stops people from finding the best food. If a vendor has been in the same spot for twenty years and locals trust it, your stomach will probably be fine. Avoid vendors with lukewarm food sitting out or those with no customers at peak hours.

    Day Two Evening: Saphan Khwai Neighborhood Eating

    Saphan Khwai caters to university students and young professionals. The food costs less than tourist areas but maintains high quality.

    Moo ping (grilled pork skewers) vendors set up around 5 PM. The pork marinates in coconut milk, fish sauce, garlic, and white pepper. Each skewer costs 10 baht. Order five. Eat them with sticky rice.

    Khao soi, a northern Thai curry noodle soup, shows up at specialized vendors. Egg noodles swim in coconut curry broth with chicken or beef. Crispy fried noodles top the bowl. Pickled mustard greens, shallots, and lime wedges come on the side. Mix everything together. The contrast between soft noodles, crispy noodles, and tangy pickles makes it work.

    For vegetables (yes, you should eat some), find the stir-fry vendors. They’ll cook any combination of vegetables with garlic, oyster sauce, and your choice of protein. Morning glory (pak boong) stir-fried with garlic and chilies is the default order.

    Final Night: Closing Strong at Ratchada Night Market

    Ratchada Train Night Market (different from the daytime train market) operates Thursday through Sunday from 5 PM to 1 AM. If your 48 hours falls on the right days, end here.

    The market has over 100 food vendors. Stick to your strategy: watch what locals order, look for specialty items, avoid vendors aggressively calling out to tourists.

    Must-try items:

    • Grilled river prawns (goong pao) with seafood sauce
    • Coconut ice cream served in a coconut shell with toppings
    • Sai krok Isaan (fermented sausage with a sour, funky flavor)
    • Khanom buang (crispy crepes filled with coconut cream)

    The beverage vendors serve Thai iced tea, fresh coconut water, and fruit shakes made with real fruit, not syrup.

    Your 48 Hours, Your Food Story

    Two days in Bangkok barely scratches the surface, but it’s enough to shift how you think about street food. You’ve learned to read vendor cues, navigate markets without English, and trust your instincts about what looks good. The dishes you’ve eaten represent generations of technique, regional variations, and family recipes that never got written down. This knowledge doesn’t come from cookbooks. It comes from showing up, sitting on plastic stools, and eating what locals eat. Take that approach to your next food destination, whether it’s similar to a week-long culinary journey through Tuscany: markets, trattorias, and cooking classes or somewhere completely different. The best meals always happen when you stop looking for perfect and start looking for real.

  • How to Build a Weekly Meal Plan Using Ingredients You Already Have

    You open the fridge at 5:30 PM on a Tuesday, stare at random containers, a half-used jar of salsa, and some wilting greens. Meanwhile, your pantry holds canned beans, pasta, and rice you bought months ago. Sound familiar? Most home cooks own enough food to make several meals, but without a plan, those ingredients become forgotten waste instead of satisfying dinners.

    Key Takeaway

    Creating a meal plan with ingredients you have requires three simple steps: inventory what you own, match those items to flexible recipes, and schedule meals strategically throughout the week. This approach saves money, reduces food waste, and eliminates stressful last-minute decisions. You’ll use pantry staples, fresh produce nearing expiration, and frozen proteins you already paid for, turning forgotten ingredients into satisfying family meals.

    Start with a Complete Kitchen Inventory

    Before you plan a single meal, you need to know what you actually have. Walk through your kitchen with paper and pen, or use your phone’s notes app.

    Check your refrigerator first. Look at produce drawers, condiment shelves, and dairy sections. Write down everything, including that half lemon and the three eggs left in the carton.

    Move to your freezer next. Frozen vegetables, meats, and half-used bags of shrimp all count. Many people forget about items buried under ice packs or shoved to the back.

    Finally, scan your pantry. Note grains, canned goods, oils, spices, and baking supplies. You probably have more than you think.

    Group your inventory into categories:

    • Proteins (chicken breasts, ground beef, canned tuna, eggs, beans)
    • Grains and starches (rice, pasta, quinoa, potatoes, bread)
    • Vegetables (fresh, frozen, or canned)
    • Dairy and alternatives (milk, cheese, yogurt, butter)
    • Pantry staples (oils, vinegars, sauces, spices)
    • Condiments and flavor builders (mustard, soy sauce, hot sauce)

    This list becomes your meal planning foundation. You’re not shopping for new ingredients. You’re building meals from what you already own.

    Match Your Ingredients to Flexible Recipes

    Now comes the creative part. Look at your inventory and identify ingredient clusters that work together.

    Do you have pasta, canned tomatoes, and garlic? That’s the base for several Italian dishes. Got rice, frozen vegetables, and soy sauce? You can make fried rice or a grain bowl.

    Think in terms of formula meals rather than exact recipes. A formula meal follows a simple structure you can adapt based on what you have.

    Here are five formulas that work with almost any ingredient combination:

    1. Grain bowls: cooked grain + protein + roasted or raw vegetables + sauce
    2. Stir fries: protein + mixed vegetables + aromatics + sauce over rice or noodles
    3. Soups: broth + vegetables + protein + grains or pasta
    4. Sheet pan dinners: protein + vegetables + oil + seasonings, all roasted together
    5. Pasta dishes: pasta + sauce base + protein or vegetables + cheese

    Each formula accepts substitutions. If a recipe calls for chicken but you have ground turkey, swap it. No fresh spinach? Use frozen. Out of spaghetti? Try any pasta shape.

    The best meal plans adapt to what you have rather than demanding specific ingredients. Focus on cooking methods and flavor profiles instead of following recipes exactly.

    When you match ingredients to formulas, write down potential meals. Don’t worry about which day yet. Just list possibilities: vegetable fried rice, chicken and rice soup, pasta with white beans and greens, breakfast burritos with eggs and salsa.

    Create Your Weekly Schedule Strategically

    You have your inventory and your meal ideas. Now arrange them across seven days in a way that makes practical sense.

    Start by identifying your busiest days. Maybe Wednesdays involve soccer practice and Thursdays mean late meetings. Those days need simpler meals or leftovers.

    Schedule your most perishable ingredients first. If you have fresh fish or leafy greens, plan those for the first half of the week. Frozen proteins and canned goods can wait until later.

    Build in leftover nights. Cook larger portions on Sunday and Wednesday, then plan to eat those leftovers on Monday and Thursday. This cuts your actual cooking days in half.

    Consider these scheduling strategies:

    Day Type Meal Strategy Example
    Busy weeknight One-pot meal or leftovers Soup, fried rice, pasta
    Moderate evening Sheet pan or skillet dinner Roasted chicken and vegetables
    Relaxed weekend Longer cooking project Slow-cooked stew, homemade pizza
    No-cook night Assembly meal Sandwiches, salads, cheese boards

    Here’s a sample week using common pantry ingredients:

    1. Sunday: Roast a whole chicken with potatoes and carrots (use fresh vegetables before they spoil)
    2. Monday: Chicken fried rice with frozen peas and leftover chicken
    3. Tuesday: Pasta with canned tomatoes, white beans, and spinach
    4. Wednesday: Make a big pot of vegetable soup using leftover chicken bones for broth
    5. Thursday: Eat that soup with grilled cheese sandwiches
    6. Friday: Breakfast for dinner using eggs, toast, and any remaining vegetables
    7. Saturday: Clean-out-the-fridge stir fry with rice and whatever vegetables remain

    Notice how this plan uses the chicken three different ways. The vegetables appear in multiple meals. Nothing goes to waste.

    Handle Common Planning Challenges

    Even with a solid plan, you’ll face obstacles. Here’s how to solve the most common problems.

    Challenge: Missing a key ingredient

    Substitute based on function, not exact match. If a recipe needs lemon juice for acidity, use vinegar. No heavy cream? Mix milk with a bit of butter. Understanding why ingredients work together based on their regional origins helps you make smarter swaps.

    Challenge: Family members want different meals

    Build meals with customizable components. Make plain pasta, then offer different toppings. Serve taco filling with both hard and soft shells. Create a grain bowl bar where everyone picks their own toppings.

    Challenge: You’re bored with the same meals

    Change your seasoning profile. The same chicken and rice becomes completely different with Italian herbs versus curry powder versus taco seasoning. Vary your cooking methods too. Roasting, sautéing, and braising all create different flavors from identical ingredients.

    Challenge: Ingredients don’t seem to go together

    Some combinations genuinely don’t work. But most ingredients are more flexible than you think. When in doubt, add a flavorful sauce or seasoning blend to tie disparate elements together.

    Make Your Plan Work All Week Long

    Planning is only half the battle. You need systems to actually follow through.

    Prep ingredients on Sunday. Chop vegetables, cook grains, and portion proteins. Even 30 minutes of prep work makes weeknight cooking faster.

    Keep your meal plan visible. Write it on a whiteboard, tape it to the fridge, or set phone reminders. When you forget the plan, you’ll default to takeout.

    Stay flexible. If Tuesday’s meal doesn’t sound appealing on Tuesday, swap it with Thursday. Your plan serves you, not the other way around.

    Track what works. After a few weeks, you’ll notice patterns. Maybe Friday is always chaotic and needs a no-cook meal. Perhaps your family loves soup on cold nights. Adjust future plans accordingly.

    Build a rotation of reliable meals. Once you find eight to ten meals that work with your common ingredients, rotate through them. You don’t need endless variety. You need meals that fit your life and use what you have.

    Turn Pantry Planning into a Lasting Habit

    Creating a meal plan with ingredients you have gets easier with practice. The first week takes effort. By week three, you’ll spot ingredient combinations instantly.

    Start small if this feels overwhelming. Plan just three dinners for your first week. Add more as the process becomes natural.

    Take photos of your pantry and freezer after grocery trips. When you’re planning meals later, you’ll remember exactly what you have without walking back to the kitchen.

    Keep a running list of meals that worked. Note which ingredients you used and any substitutions you made. This becomes your personal recipe database, customized to your actual kitchen inventory.

    The goal isn’t perfection. Some weeks you’ll nail it and waste nothing. Other weeks you’ll order pizza twice and let lettuce wilt. That’s normal. Even using this method half the time saves money and reduces waste compared to never planning at all.

    Your kitchen already holds the ingredients for dozens of satisfying meals. You just need a system to see the possibilities and a plan to make them happen. Start with what you have, build meals around those ingredients, and schedule strategically. Your wallet and your weeknight stress levels will thank you.

  • What Makes a Sauce a Mother Sauce? Understanding the Five French Foundations

    French cooking might seem intimidating, but it all starts with five simple sauces. These mother sauces form the backbone of countless recipes, from creamy pasta dishes to elegant steak toppings. Once you understand these foundations, you can create hundreds of variations and transform basic ingredients into restaurant-quality meals.

    Key Takeaway

    The five mother sauces are béchamel, velouté, espagnole, tomato, and hollandaise. French chef [Auguste Escoffier](https://en.wikipedia.org/wiki/Auguste_Escoffier) codified these sauces in the early 1900s as the foundation of classical cuisine. Each uses different base ingredients and techniques, but all serve as starting points for countless derivative sauces. Mastering these five opens up hundreds of recipe possibilities in your kitchen.

    Understanding the Mother Sauce Concept

    The term “mother sauce” refers to a basic sauce that serves as the foundation for many other sauces, called daughter sauces or small sauces. Think of them as culinary building blocks.

    Chef Auguste Escoffier refined this system in his 1903 cookbook “Le Guide Culinaire.” He reduced the original list from dozens of sauces down to five essential bases. This simplified approach made French cooking more accessible to professional chefs and home cooks alike.

    Each mother sauce relies on a specific technique and set of base ingredients. By changing the seasonings, adding different ingredients, or adjusting the ratios, you can create entirely new sauces from the same foundation.

    The Five Mother Sauces Explained

    Béchamel

    Béchamel is a white sauce made from milk thickened with a white roux. The roux is simply equal parts butter and flour cooked together until the raw flour taste disappears.

    This sauce appears in lasagna, mac and cheese, and croque monsieur sandwiches. The base recipe is straightforward:

    1. Melt butter in a saucepan
    2. Add flour and cook for 2-3 minutes while stirring
    3. Gradually whisk in warm milk
    4. Season with salt, pepper, and nutmeg

    Common daughter sauces include:
    – Mornay (béchamel with cheese)
    – Soubise (béchamel with onions)
    – Mustard sauce (béchamel with Dijon mustard)

    The key is preventing lumps. Add your milk slowly and whisk constantly. If lumps form anyway, strain the sauce through a fine mesh sieve.

    Velouté

    Velouté means “velvety” in French, and the name fits. This sauce uses white stock (chicken, fish, or veal) instead of milk, thickened with a blond roux.

    The roux for velouté cooks slightly longer than for béchamel, developing a light golden color. This adds a subtle nutty flavor without browning the sauce.

    Different stocks create different applications:
    – Chicken velouté pairs with poultry dishes
    – Fish velouté works for seafood
    – Veal velouté complements lighter meat dishes

    Popular daughter sauces include:
    – Allemande (velouté with egg yolks and lemon)
    – Suprême (chicken velouté with cream)
    – Bercy (fish velouté with white wine and shallots)

    The quality of your stock directly impacts your velouté. Homemade stock creates a richer, more flavorful sauce than store-bought versions.

    Espagnole

    Espagnole, or brown sauce, is the most complex and time-consuming mother sauce. It combines brown stock (typically veal or beef) with a brown roux and mirepoix (diced onions, carrots, and celery).

    The roux cooks until it reaches a deep brown color, which takes patience and constant stirring. This browning creates rich, complex flavors that define the sauce.

    Traditional recipes also call for tomato paste and a sachet of herbs (parsley, thyme, bay leaf, and peppercorns tied in cheesecloth).

    The sauce simmers for several hours, reducing and concentrating the flavors. Many professional kitchens prepare large batches because of the time investment.

    Demi-glace, perhaps the most famous daughter sauce, combines espagnole with more brown stock and reduces it by half. This creates an intensely flavored sauce that coats the back of a spoon.

    Other variations include:
    – Bordelaise (with red wine and shallots)
    – Chasseur (with mushrooms and white wine)
    – Robert (with mustard and onions)

    Tomato Sauce

    The tomato-based mother sauce differs from Italian marinara or American pizza sauce. The French version starts with a roux and includes pork, aromatic vegetables, and stock along with tomatoes.

    Traditional preparation involves:

    1. Create a blond roux
    2. Add crushed tomatoes or tomato purée
    3. Include salt pork or bacon for depth
    4. Add mirepoix and stock
    5. Simmer with herbs until thick and rich

    This method creates a more refined sauce than simply simmering tomatoes with garlic and herbs. The roux provides body, while the pork adds savory depth.

    Modern versions often skip the roux for a lighter texture, but the classical approach remains valuable for certain applications.

    Common derivatives include:
    – Creole sauce (with peppers and onions)
    – Spanish sauce (with peppers, mushrooms, and onions)
    – Portuguese sauce (with tomato, garlic, and onions)

    Hollandaise

    Hollandaise stands apart from the other mother sauces because it relies on an emulsion rather than a roux. This warm sauce combines egg yolks, butter, and lemon juice.

    The technique requires careful temperature control. Too much heat scrambles the eggs, while too little prevents the emulsion from forming properly.

    Basic steps include:

    1. Whisk egg yolks with water over gentle heat
    2. Slowly drizzle in melted butter while whisking constantly
    3. Add lemon juice and season with salt and cayenne

    Hollandaise is famously temperamental. The sauce can break (separate) if the temperature fluctuates or if you add the butter too fast.

    This sauce appears most often at brunch, topping eggs Benedict and asparagus. It must be served shortly after preparation because it doesn’t hold well.

    Daughter sauces include:
    – Béarnaise (with tarragon and shallots)
    – Choron (béarnaise with tomato paste)
    – Maltaise (with blood orange juice)

    Techniques That Make or Break Your Sauces

    Technique Purpose Common Mistakes
    Roux Thickens and adds body Cooking too fast, burning, adding cold liquid
    Emulsion Combines fat and water Wrong temperature, adding fat too fast
    Reduction Concentrates flavor High heat that creates bitter taste
    Straining Creates smooth texture Skipping this step, using wrong mesh size
    Tempering Prevents curdling Adding hot liquid to eggs without whisking

    Temperature control matters more than most beginners realize. A roux needs medium heat to cook the flour without burning. Hollandaise requires gentle warmth to form the emulsion. Reductions need steady simmering rather than rapid boiling.

    Whisking technique also plays a role. Constant movement prevents lumps in roux-based sauces and maintains emulsions in hollandaise. Your arm might get tired, but the result is worth the effort.

    Building Your Sauce-Making Skills

    Start with béchamel. It’s the most forgiving and requires the fewest ingredients. Once you can make a smooth, lump-free béchamel, the other roux-based sauces become easier.

    Practice your roux at different stages:
    – White roux (1-2 minutes, for béchamel)
    – Blond roux (3-5 minutes, for velouté)
    – Brown roux (15-20 minutes, for espagnole)

    Each stage requires different cooking times and produces different flavors. Understanding these differences helps you choose the right base for your dish.

    Hollandaise comes last. The technique differs completely from roux-based sauces, and the margin for error is smaller. But don’t let that intimidate you. Many cooking schools teach hollandaise early because it builds confidence and whisking skills.

    Practical Applications in Modern Cooking

    You don’t need to work in a French restaurant to use these sauces. They appear in everyday cooking more than you might think.

    Béchamel forms the base of macaroni and cheese, creamed spinach, and lasagna. Velouté creates the sauce for chicken pot pie and creamy soups. Tomato sauce obviously works for pasta, but the refined French version elevates braised dishes too.

    Espagnole might seem outdated, but demi-glace remains a staple in steakhouses and upscale restaurants. A small amount transforms a simple pan sauce into something special.

    Hollandaise extends beyond brunch. Try it over grilled fish, roasted vegetables, or poached chicken for an elegant dinner.

    Many modern chefs adapt these classical foundations. They might use cornstarch instead of roux for a gluten-free version, or substitute plant-based butter and milk for vegan options. The principles remain the same even when the ingredients change.

    Troubleshooting Common Problems

    Lumpy sauce happens to everyone. Prevention works better than fixing, but you can strain the sauce if needed. For future batches, warm your liquid before adding it to the roux and whisk constantly.

    Broken hollandaise can sometimes be saved. Start with a fresh egg yolk in a clean bowl, then slowly whisk in the broken sauce. The new yolk provides fresh emulsifiers to bring everything back together.

    Thin sauce needs more cooking time or additional thickener. Simmer longer to reduce and concentrate, or make a small amount of roux to whisk in. Add any additional thickener gradually to avoid overcorrecting.

    Burnt roux cannot be saved. The bitter flavor will permeate your entire sauce. Start over with fresh ingredients and use lower heat.

    Skin forming on top of your sauce means you need to cover it or press plastic wrap directly onto the surface. This prevents air exposure that causes the skin.

    Why These Foundations Still Matter

    Classical French technique might seem old-fashioned in an era of molecular gastronomy and fusion cuisine. But these five sauces teach fundamental cooking skills that apply far beyond French food.

    Understanding emulsions helps you make salad dressings, mayonnaise, and pan sauces. Knowing how roux works improves your gravy, soup, and stew-making abilities. Temperature control and timing translate to countless other cooking tasks.

    Professional culinary programs still teach these sauces in early coursework. They provide a shared language and common foundation for kitchen work. When a chef calls for “suprême,” everyone knows exactly which sauce to prepare.

    Home cooks benefit from this knowledge too. You can read classical recipes with confidence, adapt techniques to your own cooking, and understand why certain dishes work the way they do. A week-long culinary journey through Tuscany might introduce you to regional Italian sauces, but the French foundations help you understand the techniques behind them.

    From Foundation to Creativity

    Once you master the basic formulas, experimentation becomes easier. You understand which components provide structure and which add flavor. This knowledge lets you adjust recipes with confidence.

    Try adding different herbs to your béchamel. Swap chicken stock for seafood stock in your velouté. Use different wines in your espagnole derivatives. Add flavored vinegars to your hollandaise.

    The possibilities multiply quickly. Each mother sauce has dozens of documented daughter sauces, and you can create your own variations too.

    Some chefs argue for a sixth mother sauce. Mayonnaise gets mentioned frequently because it relies on emulsion like hollandaise but uses raw eggs and oil instead. Others suggest vinaigrette deserves mother sauce status. The debate continues, but the classical five remain the standard.

    Your Sauce-Making Journey Starts Here

    Learning these five sauces takes time and practice. You’ll make mistakes, burn a roux, break an emulsion, or create lumps. That’s part of the process.

    Start with one sauce and make it several times until you feel comfortable. Then move to the next. Take notes about what works and what doesn’t. Adjust heat levels, timing, and whisking techniques based on your stove and equipment.

    The skills you develop transfer to countless other recipes. You’ll find yourself making better gravy at Thanksgiving, creamier soups in winter, and more elegant dinner party dishes year-round. These foundations support a lifetime of cooking growth and creativity in your kitchen.

  • Why Do We Eat What We Eat? The Fascinating Geography Behind Regional Ingredients

    Have you noticed how coastal cities serve fish at nearly every meal while mountain towns favor hearty stews and preserved meats? The food on your plate tells a story written by the landscape around you. Geography doesn’t just influence what we eat. It dictates it.

    Key Takeaway

    Geography determines regional diets through climate, terrain, water access, and soil quality. Coastal areas develop seafood traditions while landlocked regions rely on livestock and grains. Temperature zones dictate crop varieties, preservation methods, and cooking techniques. Understanding why do we eat what we eat geography reveals how physical landscapes create distinct food cultures that persist across generations, shaping everything from daily meals to holiday celebrations.

    Climate Creates Your Menu

    Temperature and rainfall patterns write the first draft of every regional cuisine. Rice paddies need consistent water and warm temperatures. Wheat thrives in temperate zones with moderate rainfall. Corn grows in areas with hot summers and adequate moisture.

    These aren’t random preferences. They’re biological requirements.

    Mediterranean climates produce olives, grapes, and citrus fruits. The hot, dry summers and mild, wet winters create perfect conditions for these crops. Northern European climates favor root vegetables like potatoes, turnips, and beets that can withstand cold soil and shorter growing seasons.

    Tropical regions near the equator grow bananas, coconuts, and cacao year-round. The constant warmth and humidity support plants that would die in a single frost. Arctic communities historically relied on fish, seal, and caribou because virtually nothing grows in permafrost.

    Your great-grandmother’s recipes reflect the crops that actually survived in her backyard. That’s not tradition. That’s survival translated into flavor.

    Terrain Shapes Protein Sources

    Mountains, plains, and coastlines each offer different food opportunities. Flat grasslands support grazing animals. Cattle ranching dominates the American Great Plains, the Argentine Pampas, and the Mongolian steppes for the same reason: endless grass.

    Mountainous regions favor smaller livestock. Goats and sheep navigate steep slopes better than cattle. They eat scrubby vegetation that cows ignore. This explains why Greek, Swiss, and Himalayan cuisines feature goat and sheep cheese rather than beef.

    Coastal communities build their diets around seafood. Japan, Norway, and Portugal developed rich fishing traditions not because of cultural preference but because of proximity. When the ocean sits outside your door, you learn to use it.

    Rivers provide another protein source. Freshwater fish like catfish, trout, and salmon shaped cuisines along the Mississippi, the Rhine, and countless other waterways. Communities learned which fish ran during which seasons and built their calendars around these migrations.

    “Geography doesn’t just suggest ingredients. It limits your choices so severely that entire food cultures emerge from what’s simply available within walking distance.”

    Water Access Determines Cooking Methods

    The availability of fresh water influences how people prepare food. Desert cuisines often feature one-pot meals that minimize water use. Tagines in Morocco and biryanis in parts of India cook everything together, creating moisture through condensation rather than boiling in large quantities of water.

    Regions with abundant water developed different techniques. Boiling, blanching, and steaming require generous water supplies. Asian cuisines that developed near major rivers use these methods extensively. Pasta requires boiling water. Rice often needs twice its volume in liquid.

    Water scarcity also drives preservation methods. Salt curing, sun drying, and smoking extend shelf life without refrigeration. These techniques emerged in hot, arid climates where food spoiled rapidly and water for canning wasn’t available.

    Fermentation offers another water-efficient preservation method. Kimchi, sauerkraut, and pickles rely on salt and time rather than water and heat. These foods appear across cultures that needed to preserve harvests through long winters or dry seasons.

    Soil Quality Dictates Crop Choices

    Not all dirt grows the same food. Volcanic soil produces different crops than sandy coastal soil or clay-heavy river valleys. The minerals, pH levels, and drainage patterns in soil determine which plants will thrive.

    Wine regions illustrate this perfectly. Champagne grapes grow in chalky limestone soil. Bordeaux wines come from gravelly terrain. Napa Valley’s volcanic soil produces different flavor profiles than Oregon’s sedimentary soils. The same grape variety tastes different depending on what feeds its roots.

    Grain preferences follow similar patterns. Rice needs waterlogged paddies. Wheat prefers well-drained soil. Corn tolerates a wider range but produces better yields in rich, loamy earth. These requirements created distinct grain belts around the world.

    Coffee and tea also reflect soil preferences. Coffee grows best in volcanic soil at high altitudes. Tea prefers acidic, well-drained soil in misty mountain regions. You can’t swap their locations and expect the same results.

    Seasonal Patterns Create Food Calendars

    The length and intensity of seasons determine when food becomes available and how communities preserve it. Four-season climates developed elaborate preservation traditions because nothing grew for months at a time.

    Canning, pickling, and root cellars emerged in temperate zones. Summer’s abundance had to last through winter’s scarcity. Fruit preserves, pickled vegetables, and stored grains became staples not because people loved them but because fresh food disappeared for half the year.

    Tropical regions with minimal seasonal variation developed different patterns. Fresh fruit and vegetables remain available year-round. Preservation techniques focus on enhancing flavor rather than extending shelf life. Fermented fish sauces and aged spice pastes add complexity rather than solve scarcity.

    Monsoon regions built their food calendars around dramatic wet and dry seasons. Planting and harvesting align with rainfall patterns. Rice cultivation in Southeast Asia follows monsoon schedules so precisely that entire cultural calendars revolve around these cycles.

    Distance From Trade Routes Influences Ingredients

    Geographic isolation creates distinct cuisines. Islands and landlocked mountain regions develop food traditions based entirely on what grows locally. Iceland’s traditional diet featured fermented shark and dried fish because importing fresh produce was impossible for most of its history.

    Trade routes introduce new ingredients but geography determines which routes exist. The Silk Road connected Asia and Europe because mountain passes and desert oases made the journey possible. Spices, tea, and silk traveled this route, transforming cuisines along the way.

    Coastal cities with natural harbors became culinary melting pots. Port cities like Istanbul, New Orleans, and Singapore developed fusion cuisines because ships brought ingredients from around the world. Geographic features that made good harbors also made diverse food cultures.

    Landlocked regions far from trade routes maintained more isolated food traditions. The ingredients available didn’t change much over centuries. These cuisines often seem more “authentic” because they evolved without outside influence, shaped purely by local geography.

    Altitude Changes Everything

    Height above sea level affects both what grows and how you cook it. Higher altitudes mean lower air pressure, which changes boiling points and cooking times. Water boils at lower temperatures on mountaintops, making some cooking methods impractical.

    High-altitude cuisines favor roasting, grilling, and pressure cooking. Boiling takes too long and uses too much fuel. Andean communities developed pressure cooking techniques centuries before modern pressure cookers existed, using sealed clay pots to trap steam.

    Crops also change with elevation. Coffee grows at specific altitude ranges. Too low and it tastes flat. Too high and it won’t ripen. Potatoes originated in high-altitude Peru because they tolerate cool temperatures and intense sun that would damage other crops.

    Oxygen levels affect fermentation and baking. Bread recipes that work at sea level fail at high altitudes. The lower air pressure makes dough rise faster and collapse easier. Tibetan and Andean baking traditions developed different techniques to compensate.

    How Geography Creates Regional Specialties

    Understanding why do we eat what we eat geography means recognizing patterns that repeat worldwide. Similar landscapes produce similar cuisines even when cultures never contacted each other.

    Here’s how geography translates into regional food characteristics:

    1. Identify the climate zone and its temperature range
    2. Note the terrain type and elevation changes
    3. Map water sources and seasonal availability
    4. Test soil composition and drainage patterns
    5. Calculate growing season length and frost dates
    6. Assess natural barriers and trade route access

    These factors combine to create what’s possible on a plate. Culture and tradition build on this foundation, but geography sets the limits.

    Geographic Feature Typical Ingredients Common Cooking Methods Preservation Techniques
    Coastal regions Seafood, seaweed, salt Steaming, raw preparation Salt curing, drying, smoking
    Mountain areas Goat, sheep, root vegetables Roasting, stewing Cheese making, fermentation
    River valleys Freshwater fish, rice, vegetables Boiling, steaming Pickling, sun drying
    Grasslands Beef, wheat, dairy Grilling, baking Butter making, grain storage
    Tropical zones Tropical fruits, coconut, spices Light cooking, raw dishes Fermentation, spice preservation
    Desert regions Dates, lamb, preserved foods One-pot cooking, grilling Drying, salt preservation

    Modern Transportation Hasn’t Erased Geographic Influence

    You can buy strawberries in January and mangoes in Maine, but geography still shapes what most people eat most of the time. Local and seasonal ingredients cost less and taste better because they don’t travel thousands of miles.

    Regional food traditions persist because they make sense for the landscape. Italian cuisine still centers on tomatoes, olive oil, and wheat because these grow abundantly in Mediterranean climates. Scandinavian food still features preserved fish and root vegetables because these survive northern winters.

    Even in cities with access to global ingredients, people gravitate toward foods that match their climate. Hot weather drives demand for cold soups and fresh salads. Cold weather increases sales of stews and roasted meats. Your body responds to the same geographic signals that shaped your ancestors’ diets.

    A week-long culinary journey through Tuscany demonstrates how regional geography continues to define authentic food experiences. The ingredients, techniques, and flavors all connect directly to the Tuscan landscape.

    Reading Your Landscape Through Food

    Traditional dishes function as edible maps. They tell you what grows nearby, which seasons matter, and how people adapted to their environment. A bowl of gumbo reveals Louisiana’s wetlands, seafood access, and French-African cultural mixing. A plate of sushi shows Japan’s island geography and fishing traditions.

    You can reverse-engineer climate and terrain from a region’s signature dishes. Heavy cream sauces suggest dairy country with cool temperatures. Coconut milk curries indicate tropical coastlines. Preserved lemons point to hot, arid climates with citrus trees.

    This knowledge helps you understand not just what people eat but why certain ingredients pair together. Foods that grow in the same climate and season naturally complement each other. Tomatoes and basil both thrive in warm Mediterranean summers. Their flavor combination isn’t accidental.

    Common Geographic Mistakes in Understanding Regional Food

    Many people misunderstand why regional cuisines developed their distinctive characteristics:

    • Assuming cultural preference drove ingredient choices when geography limited options
    • Thinking traditional dishes could have used different ingredients that didn’t grow locally
    • Believing preservation techniques were about flavor rather than necessity
    • Expecting recipes to work the same way in different climates and altitudes
    • Ignoring how water availability shaped cooking methods
    • Overlooking soil quality’s impact on ingredient flavors
    • Forgetting that trade routes depended on geographic features

    Your Plate Reflects Your Place

    Every meal connects you to the ground beneath your feet. The vegetables at the farmers market grow in your region’s soil and climate. The local specialties your grandparents made used ingredients that thrived in your specific landscape.

    Geography wrote the first cookbook for every region on Earth. Climate determined which plants survived. Terrain shaped which animals people could raise. Water sources influenced cooking techniques. Soil quality affected flavors.

    Understanding why do we eat what we eat geography transforms how you see food. That morning coffee grew in volcanic soil at a specific altitude. Your lunch salad contains vegetables suited to your local growing season. Dinner’s protein source reflects whether you live near water, grasslands, or mountains.

    The next time you sit down to eat, look past the recipe to the landscape that made it possible. Your food tells the story of your place on this planet, written in flavors shaped by millions of years of geographic forces. That’s not just dinner. That’s edible geography on your fork.

  • 7 Bizarre Delicacies That Will Test Your Culinary Courage

    Balut in the Philippines looks innocent enough until you crack the shell and find a partially developed duck embryo staring back at you. For many travelers, this moment marks the line between curious foodie and true culinary adventurer. But balut is just one entry in a global catalog of dishes that make even seasoned food lovers pause before taking that first bite.

    Key Takeaway

    The weirdest foods around the world reflect deep cultural traditions and survival innovations. From Iceland’s fermented shark to Mexico’s ant larvae, these dishes challenge Western palates while offering insight into how different societies transform unusual ingredients into prized delicacies. Understanding these foods means respecting the history and resourcefulness behind them.

    Foods That Push Boundaries

    Every culture develops its own definition of edible. What seems bizarre to outsiders often represents centuries of culinary tradition, environmental adaptation, or pure necessity turned into celebration.

    The weirdest foods around the world share common threads. Many come from coastal communities that learned to preserve seafood without refrigeration. Others emerged from landlocked regions where protein sources were scarce. Some developed as delicacies for the wealthy, while others kept entire populations fed during harsh seasons.

    These dishes test more than just taste buds. They challenge our assumptions about what belongs on a plate and force us to confront the cultural conditioning that shapes our food preferences from childhood.

    Seven Foods That Define Culinary Courage

    1. Hákarl (Fermented Shark)

    Iceland’s national dish starts with Greenland shark, a creature whose flesh contains toxic levels of uric acid and trimethylamine oxide. Vikings discovered that burying the shark for months, then hanging it to dry for several more, breaks down these compounds into something technically edible.

    The result smells like ammonia mixed with rotten fish. The taste registers somewhere between blue cheese and cleaning products. Most Icelanders eat it during Þorrablót, a midwinter festival celebrating traditional foods.

    First-time tasters should follow local advice: hold your nose, swallow fast, and chase it with brennivín, Iceland’s signature schnapps. The alcohol helps mask the aftertaste that can linger for hours.

    2. Sannakji (Live Octopus)

    Korean restaurants serve this dish with the octopus tentacles still writhing on the plate. Chefs cut a small octopus into pieces moments before serving, and the nerve activity keeps the suction cups functioning for several minutes.

    The danger is real. Several people die each year when suction cups attach to their throat during swallowing. Proper technique requires thorough chewing to disable the suckers before attempting to swallow.

    The texture dominates the experience. Each piece squirms against your tongue and teeth, creating a sensation that no amount of mental preparation can fully prepare you for. The flavor itself is mild and slightly sweet, similar to regular octopus.

    3. Casu Marzu (Maggot Cheese)

    Sardinian cheesemakers deliberately introduce cheese fly larvae into pecorino. The maggots eat through the cheese, breaking down fats and creating an extremely soft, creamy texture with a strong flavor.

    Live larvae remain in the cheese when served. They can jump up to six inches when disturbed, so experienced eaters cover the cheese with their hand while taking a bite. Some people remove the maggots first. Others consider them essential to the authentic experience.

    The European Union banned casu marzu for health reasons, but Sardinians continue making it as a cultural tradition. You need local connections to try it, as shops cannot legally sell it.

    4. Balut (Fertilized Duck Egg)

    Filipino street vendors sell these eggs boiled and served warm in the shell. Development ranges from 14 to 21 days, with different stages offering different experiences. Younger balut contains mostly liquid with small embryonic features. Older versions have recognizable beaks, feathers, and bones.

    Eating balut follows a ritual:

    1. Crack a small hole in the top of the shell
    2. Sip the savory broth inside
    3. Peel away more shell to access the egg and embryo
    4. Season with salt, vinegar, or chili
    5. Eat everything in one or two bites

    The taste resembles rich chicken soup mixed with hard-boiled egg. The texture varies from creamy yolk to slightly crunchy bones. Many Filipinos eat balut as a protein-rich snack, particularly after drinking.

    5. Fugu (Pufferfish)

    Japanese chefs train for years to earn a license to prepare this potentially lethal fish. Pufferfish organs contain tetrodotoxin, a poison 1,200 times deadlier than cyanide. One fish contains enough toxin to kill 30 people.

    Licensed chefs remove the toxic parts with surgical precision. Even with proper preparation, fugu causes several deaths annually in Japan, usually from amateur preparation or daredevils eating the toxic liver intentionally.

    The meat itself tastes mild and slightly sweet. Restaurants serve it as sashimi, in hot pots, or fried. The appeal lies more in the thrill and prestige than the flavor. Fugu meals cost $100 to $500 per person at reputable establishments.

    6. Escamoles (Ant Larvae)

    Mexican cuisine treats these larvae from giant black ants as a luxury ingredient. Harvesting happens only during a brief spring season when workers must brave stinging ants to extract larvae from underground nests.

    The texture resembles cottage cheese. The flavor is mild, nutty, and slightly buttery. Chefs typically sauté escamoles with butter and spices, serving them in tacos or as a standalone dish.

    High-end Mexico City restaurants charge premium prices for escamoles. The seasonal availability and dangerous harvest justify costs that can exceed those of caviar per ounce.

    7. Surströmming (Fermented Herring)

    Swedish tradition ferments Baltic herring just enough to prevent rotting while creating one of the world’s most pungent foods. The fermentation produces pressure that makes cans bulge outward. Opening a can indoors can make a space uninhabitable for hours.

    Swedes open surströmming outdoors, preferably underwater to contain the smell. They serve the fish on thin bread with potatoes, onions, and sour cream. The combination mellows the intense flavor and creates a dish that locals genuinely enjoy.

    The smell registers as one of the most overwhelming food odors on Earth. Studies measuring volatile compounds found surströmming produces a more intense smell than many substances classified as chemical weapons.

    Understanding the Appeal

    “What we consider disgusting often reflects what we learned to avoid as children rather than any objective measure of food safety or quality. Breaking through that conditioning opens up entire worlds of flavor and cultural understanding.” – Anthony Bourdain

    These foods persist because they mean something to the cultures that created them. Hákarl represents Icelandic resilience. Balut provides affordable nutrition. Fugu demonstrates Japanese precision and respect for danger. Escamoles connect modern Mexicans to pre-Columbian traditions.

    Trying these foods shows respect for cultural differences and willingness to step outside comfort zones. Many travelers report that eating the weirdest local dish becomes their most memorable cultural experience.

    Common Characteristics of Extreme Foods

    The weirdest foods around the world share patterns that help explain their existence and persistence:

    • Preservation techniques that developed before refrigeration
    • Protein sources from regions with limited conventional options
    • Status symbols that demonstrate wealth or bravery
    • Seasonal specialties tied to specific harvest times
    • Acquired tastes that locals learn to appreciate from childhood
    • Ritual significance connected to festivals or celebrations
    Food Country Primary Challenge Cultural Context
    Hákarl Iceland Ammonia smell Viking preservation method
    Sannakji Korea Still moving Freshness demonstration
    Casu Marzu Italy Live maggots Sardinian tradition
    Balut Philippines Visible embryo Affordable protein
    Fugu Japan Potentially lethal Culinary precision
    Escamoles Mexico Insect larvae Pre-Columbian delicacy
    Surströmming Sweden Extreme odor Historical preservation

    Preparing Your Palate

    Approaching extreme foods requires mental preparation as much as physical readiness. Your brain makes snap judgments about food safety based on appearance and smell. Overriding those instincts takes conscious effort.

    Start with milder versions of challenging foods. Try regular octopus before attempting the live version. Eat strong cheeses before tackling casu marzu. Build tolerance gradually rather than jumping straight to the most extreme option.

    Research the proper eating method before trying unfamiliar foods. Many dishes require specific preparation or accompaniments that make them more palatable. Locals developed these techniques over generations for good reason.

    Consider the setting carefully. Eating hákarl at a tourist trap differs vastly from sharing it with Icelanders during a traditional festival. Context and company influence the experience as much as the food itself.

    Health and Safety Considerations

    Not all weird foods carry equal risk. Some require expert preparation to avoid serious illness or death. Others are perfectly safe but challenge only your sensory comfort.

    Fugu demands licensed preparation. Never eat pufferfish from unlicensed sources or attempt to prepare it yourself. The risk is not worth the experience.

    Live octopus causes choking deaths. Chew thoroughly and never attempt to swallow large pieces. Skip this dish if you have any throat or swallowing issues.

    Casu marzu’s illegal status reflects genuine health concerns. The cheese fly larvae can survive digestion and potentially cause intestinal problems. Eating it means accepting real risk.

    Fermented foods like hákarl and surströmming are safe if properly prepared. The smell and taste may be overwhelming, but they will not harm you. The same applies to balut and escamoles when sourced from reputable vendors.

    Where to Find These Foods

    Authentic versions of extreme foods require traveling to their regions of origin. Tourist-friendly versions often modify recipes to reduce the challenge factor, defeating the purpose for true adventurers.

    Iceland’s hákarl appears at traditional restaurants and during Þorrablót festivals in January and February. Some shops sell vacuum-sealed portions for brave tourists.

    Korean cities offer sannakji at seafood restaurants, particularly in coastal areas and major markets. Seoul’s Noryangjin Fish Market provides numerous options.

    Sardinian casu marzu requires local connections. Ask at traditional restaurants or cheese shops, but understand that sellers risk fines for offering it.

    Filipino balut vendors operate throughout the Philippines, particularly in Manila and other urban areas. Street vendors sell it fresh every evening.

    Japanese fugu restaurants concentrate in Osaka and Tokyo. Make reservations at licensed establishments with strong reputations.

    Mexican escamoles appear on menus at high-end restaurants in Mexico City during spring months. Some markets sell them for home preparation.

    Swedish surströmming is available at specialty shops throughout Sweden, with peak season in late summer. Many Swedes host surströmming parties outdoors.

    The Psychology Behind Food Fear

    Understanding why these foods provoke such strong reactions helps overcome the initial resistance. Human brains evolved to be suspicious of unfamiliar foods as a survival mechanism. What looks or smells wrong might be poisonous.

    Cultural conditioning adds another layer. Children learn food preferences by watching adults and peers. If everyone around you rejects insects as food, your brain categorizes them as inedible regardless of their nutritional value.

    Disgust serves as a protective emotion. It keeps you from eating spoiled food or potential toxins. But this same mechanism can trigger false alarms when encountering safe foods that simply look or smell unusual.

    Breaking through food fear requires conscious override of these automatic responses. Watching locals eat something with obvious enjoyment helps convince your brain that the food is safe. Understanding the cultural context and preparation methods provides rational justification for trying something your instincts reject.

    Beyond the Initial Bite

    Many travelers report that the anticipation proves worse than the actual experience. Once you take that first bite, the mystery disappears. The food becomes just food, even if it is not something you would choose to eat regularly.

    Some extreme foods turn into genuine favorites. Balut fans appreciate the rich flavor and satisfying texture once they get past the visual aspect. Escamoles taste delicious enough that many people forget they are eating insect larvae.

    Other dishes remain challenging no matter how many times you try them. Hákarl never stops smelling like ammonia. Surströmming always triggers a gag reflex. But completing the challenge creates stories worth telling and memories that last.

    The experience changes how you think about food. Trying the weirdest dishes makes everything else seem less intimidating. Regular sushi becomes boring after you have eaten live octopus. Blue cheese tastes mild after casu marzu.

    Respecting Food Traditions

    Approaching extreme foods as entertainment misses the deeper significance. These dishes represent cultural heritage, environmental adaptation, and human ingenuity in the face of scarcity.

    Icelanders did not ferment shark because they enjoyed the smell. They did it to survive winters when fresh food disappeared. The dish connects modern Icelanders to their Viking ancestors who developed the technique.

    Filipinos eat balut because it provides affordable, accessible protein. Mocking the dish while trying it disrespects millions of people for whom it represents practical nutrition rather than a dare.

    Japanese fugu preparation demonstrates values of precision, training, and respect for danger that permeate the culture. Treating it as a thrill ride ignores the serious craftsmanship involved.

    Try these foods with genuine curiosity and respect. Learn the history and cultural context. Thank the people who prepare them. Recognize that your discomfort reflects your background, not any inherent wrongness in the food.

    Building Your Weird Food Resume

    Adventurous eaters often track their extreme food experiences like achievements. Each new dish expands your culinary comfort zone and provides conversation material for years.

    Start with foods that challenge only one aspect of your preferences. If texture bothers you more than flavor, begin with strong-tasting but normally-textured foods. If appearance is your main barrier, try foods that taste normal but look unusual.

    Work up to combinations of challenges. Casu marzu tests appearance, texture, and flavor simultaneously. Sannakji adds movement to the equation. Fugu includes psychological fear of death.

    Document your experiences through photos and notes. The details fade quickly, but recording your reactions preserves the memory. Many travelers create blogs or social media content around their weird food adventures.

    Connect with other adventurous eaters. Online communities share tips about where to find specific dishes and how to approach them. Fellow travelers understand the appeal in ways that friends back home may not.

    When Weird Becomes Wonderful

    The weirdest foods around the world offer more than bragging rights. They provide windows into different ways of thinking about ingredients, preparation, and the fundamental question of what makes something food.

    These experiences humble us. They remind us that our food preferences are learned rather than universal. They demonstrate that billions of people thrive on diets that would horrify us if we examined them too closely.

    They also connect us to our own adventurous nature. Trying hákarl or balut requires courage of a different sort than physical bravery. It demands willingness to be uncomfortable, to potentially embarrass yourself, and to challenge your own assumptions.

    The weirdest foods become markers of personal growth. You remember who you were before you ate live octopus and who you became after. The change is small but real. You proved to yourself that you can handle more than you thought.

    Most importantly, these foods connect you to the places and people who created them. Sharing a challenging meal with locals builds bonds that tourist activities cannot match. You become part of their tradition, even if only for one memorable meal.

  • A Week-Long Culinary Journey Through Tuscany: Markets, Trattorias, and Cooking Classes

    A week in Tuscany changes how you think about food. Not because of some abstract culinary philosophy, but because you’ll knead pasta dough at sunrise, haggle for porcini at a centuries-old market, and drink Chianti with the farmer who grew the grapes. This isn’t a vacation where you watch cooking happen. It’s seven days of flour on your hands, olive oil in your hair, and recipes you’ll actually make when you get home.

    Key Takeaway

    A tuscany culinary tour week combines hands-on cooking instruction, market shopping, winery visits, and meals at family-run trattorias. Most programs include accommodation at rural estates, daily cooking sessions with local chefs, excursions to Florence or Siena, and tastings of regional specialties like pecorino, truffles, and Brunello wine. Expect to master 20 to 30 traditional recipes while staying in converted farmhouses surrounded by vineyards and olive groves.

    What a Week-Long Culinary Program Actually Includes

    Most Tuscany culinary tour week programs follow a similar rhythm, though each operator adds their own twist. You’ll typically arrive on a Sunday afternoon at a villa or agriturismo property. After settling in, the group gathers for an introductory dinner featuring regional wines and antipasti. This first meal sets the tone and introduces you to ingredients you’ll work with all week.

    Monday through Friday follow a pattern. Mornings often start with coffee and pastries before heading into the kitchen around 9 a.m. You’ll spend three to four hours preparing a multi-course lunch under the guidance of a chef or cooking instructor. These aren’t demonstration classes where you watch from the back. You’ll be assigned stations, given tasks, and expected to produce results.

    After lunch and cleanup, afternoons offer flexibility. Some days include excursions to nearby towns, cheese producers, or olive oil mills. Other afternoons are free for napping, reading by the pool, or wandering through nearby villages. Evening meals rotate between dining at the villa, visiting local trattorias, and occasional restaurant outings in larger towns.

    The week typically includes:

    • Three to five hands-on cooking classes
    • One or two market tours with a chef
    • At least one winery visit with tasting
    • Excursions to Florence, Siena, or San Gimignano
    • Visits to artisan producers (cheese makers, butchers, bakers)
    • All meals, with wine included at dinners
    • Accommodation in shared or private rooms
    • Transportation for scheduled activities

    Choosing the Right Program for Your Skill Level

    Programs range from beginner-friendly to intensive chef training. Understanding what you’re signing up for prevents disappointment and ensures you get the experience you want.

    Beginner programs assume no cooking experience. Instructors walk you through basic knife skills, explain why certain techniques work, and provide plenty of supervision. These programs focus on classic dishes like hand-rolled pici pasta, ribollita soup, and bistecca alla fiorentina. You’ll leave with confidence in fundamental Italian cooking methods.

    Intermediate programs move faster and cover more complex preparations. Expect to make fresh pasta in multiple shapes, break down whole chickens, and work with seasonal ingredients that require quick adaptation. Instructors provide less hand-holding and expect you to follow recipes with minimal guidance.

    Advanced programs attract culinary professionals or serious home cooks. These often involve restaurant stages, early morning market runs, and longer kitchen sessions. You might work alongside the chef preparing meals for other guests or participate in multi-day projects like curing meats or making aged cheeses.

    “The best culinary programs teach you to think like a Tuscan cook, not just follow recipes. You learn to taste the soil in the tomatoes, adjust salt based on the pecorino’s age, and understand why grandmother’s method works better than the modern shortcut.” – Chef instructor at a Chianti cooking school

    A Day-by-Day Breakdown of a Typical Week

    Understanding the flow helps you pack appropriately and manage expectations. Here’s what a standard Tuesday through Saturday schedule looks like.

    Day 1 (Arrival Sunday): Check in between 2 and 6 p.m. Unpack, tour the property, meet fellow participants. Welcome dinner at 7:30 p.m. with local wines and traditional antipasti. Early bedtime to adjust to the time change.

    Day 2 (Monday): Breakfast at 8 a.m. First cooking class begins at 9 a.m., focusing on fresh pasta and simple sauces. Prepare lunch together, eat around 1 p.m. Free afternoon. Dinner at a nearby trattoria at 8 p.m.

    Day 3 (Tuesday): Early departure at 7:30 a.m. for Florence market tour. Shop with the chef, learn to select produce, meet vendors. Return to villa for cooking class using purchased ingredients. Afternoon free. Dinner at the villa featuring the day’s preparations.

    Day 4 (Wednesday): Cooking class focused on meat and poultry. Learn to prepare rabbit, duck, or wild boar. Lunch follows. Afternoon excursion to a Brunello winery in Montalcino. Tasting and cellar tour. Return for light dinner.

    Day 5 (Thursday): Morning cooking class covering bread and focaccia. Afternoon trip to a pecorino producer in Pienza. Watch cheese making, taste various ages, buy some to take home. Dinner at a family-run osteria in a hilltop village.

    Day 6 (Friday): Final cooking class, often featuring student choice of recipes or regional specialties like pappa al pomodoro. Celebratory lunch with special wines. Afternoon free for last-minute shopping or relaxation. Farewell dinner at the villa with all participants.

    Day 7 (Saturday): Breakfast and departure. Most programs end by 10 a.m. to allow travel to Florence or other destinations.

    What You’ll Actually Cook During the Week

    The menu varies by season, instructor preference, and regional location, but certain dishes appear in nearly every program. Understanding the core curriculum helps you decide if the program matches your interests.

    Dish Category Common Preparations Techniques Learned
    Fresh Pasta Pici, pappardelle, ravioli, tortelli Hand rolling, shaping, filling, dough consistency
    Soups Ribollita, pappa al pomodoro, acquacotta Bread-based soups, vegetable prep, layering flavors
    Meat Dishes Bistecca, osso buco, wild boar ragu Butchering basics, braising, grilling over wood
    Vegetables Panzanella, fagioli all’uccelletto, fried artichokes Seasonal selection, proper salting, olive oil usage
    Desserts Cantucci, panna cotta, castagnaccio Nut toasting, custard technique, chestnut flour work
    Bread Tuscan saltless bread, schiacciata, focaccia Yeast management, oven temperature, scoring

    Most programs aim to teach 20 to 30 complete recipes during the week. You’ll receive a bound recipe book or digital file with all preparations, including notes on substitutions and techniques.

    The Market Experience and What to Expect

    Market tours rank among the most memorable parts of any tuscany culinary tour week. They typically happen early in the week, often on Tuesday or Wednesday morning. You’ll leave the villa around 7 or 7:30 a.m. to reach the market when vendors are setting up and produce is freshest.

    Florence’s Mercato Centrale and Sant’Ambrogio market are common destinations, though some programs visit smaller town markets in Lucca, Arezzo, or Cortona. The chef leads the group through stalls, explaining what’s in season, how to judge quality, and which vendors offer the best products.

    You’ll learn to:

    1. Identify ripe tomatoes by smell and weight, not just appearance
    2. Select the right cut of meat by asking questions and describing your recipe
    3. Recognize fresh versus previously frozen fish through eye clarity and smell
    4. Negotiate prices politely while respecting vendor expertise
    5. Understand why certain vegetables appear only during specific weeks

    The chef typically purchases ingredients for that day’s cooking class. You’re encouraged to buy items for yourself, though luggage space limits what you can transport home. Vacuum-packed meats, aged cheeses, dried porcini, and bottled sauces travel well.

    After shopping, many programs stop at a historic cafe for espresso and pastries before returning to the villa. This transition time allows the group to discuss purchases and ask questions about ingredients.

    Accommodation Styles and What They Mean for Your Experience

    Where you stay significantly impacts your week. Most programs use one of three accommodation types, each offering different atmospheres and amenities.

    Working farms and agriturismos provide the most authentic rural experience. You’ll stay in converted farm buildings surrounded by active vineyards, olive groves, or livestock. Rooms are simple but comfortable, often with shared bathrooms. Meals feature ingredients grown on the property. You might wake to roosters and fall asleep to complete silence. These properties work best for people who want total immersion and don’t need luxury amenities.

    Restored villas and estates offer more polish while maintaining historical character. Expect private bathrooms, air conditioning, swimming pools, and manicured gardens. These properties often date to the 15th or 16th century and feature period details like frescoed ceilings and stone fireplaces. The cooking facilities are professional-grade, and common areas provide space for relaxation between activities. This option suits travelers who want comfort without sacrificing authenticity.

    Hotel-based programs use boutique properties in towns like Florence, Siena, or Greve in Chianti as a home base. You’ll travel to cooking venues, wineries, and restaurants rather than staying at a single location. This approach offers more dining variety and easier access to sightseeing but less immersion in rural life. Best for people who want urban amenities and nightlife options.

    Most programs accommodate 8 to 16 participants. Smaller groups receive more individual attention but less social energy. Larger groups create more interaction but can feel crowded during cooking sessions.

    Wine Education Throughout the Week

    Wine isn’t just served with meals. It’s woven into the entire experience. Most programs include at least one dedicated winery visit, often to a Chianti Classico or Brunello producer. You’ll tour cellars, learn about aging in oak versus cement, and taste current releases alongside older vintages.

    During cooking classes, instructors explain which wines pair with specific dishes and why. You’ll learn that Vernaccia di San Gimignano’s minerality cuts through the richness of fried foods, while Vino Nobile di Montepulciano’s tannins complement grilled meats. This practical education happens through tasting, not lecture.

    Some programs include lessons in:

    • Reading Italian wine labels and understanding DOC versus DOCG classifications
    • Recognizing Sangiovese characteristics across different appellations
    • Storing and serving wine at proper temperatures
    • Building a cellar of Tuscan wines for aging

    You’ll drink well throughout the week. Lunch and dinner always include wine, typically two or three bottles shared among the table. Quality varies by program budget, but even mid-priced offerings feature excellent local producers rarely exported to international markets.

    Common Mistakes and How to Avoid Them

    Mistake Why It Happens How to Prevent It
    Overpacking luggage Wanting options for every situation Bring layers and comfortable shoes only; you’ll wear the same outfit multiple times
    Skipping travel insurance Assuming nothing will go wrong Purchase coverage that includes cooking-related injuries and trip cancellation
    Not disclosing dietary restrictions early Embarrassment or hoping to manage quietly Inform the organizer at booking; Italian cuisine adapts well to most restrictions
    Arriving jet-lagged without adjustment time Booking the program immediately after arrival Spend two nights in Florence or Rome before the program starts
    Buying too much at markets Excitement and reasonable prices Remember luggage weight limits; ship items or buy at the end of the week
    Treating it like a resort vacation Expecting passive entertainment Prepare for active participation, early mornings, and physical kitchen work

    Extending Your Trip Before or After the Program

    Most participants add several days in Florence, Siena, or Rome to maximize the transatlantic flight investment. Arriving two or three days early allows you to adjust to the time zone, see major museums, and start acclimating to the language and culture.

    Florence makes an ideal starting point. You can take cooking classes at schools like In Tavola or Cucina Lorenzo, visit the Uffizi and Accademia museums, and eat at traditional spots like Trattoria Mario or All’Antico Vinaio. The city’s compact center means you can walk everywhere.

    After the program, consider spending time in southern Tuscany. Montepulciano, Pienza, and Montalcino form a triangle of wine towns easily reached by car. You can visit the same wineries and cheese makers introduced during your program week, buying products you tasted and building relationships with producers.

    Some participants extend into Umbria, just east of Tuscany. The towns of Perugia, Assisi, and Orvieto offer different culinary traditions, including black truffles, porchetta, and Sagrantino wine. The region feels less touristy while maintaining similar landscapes and food culture.

    Practical Details That Matter

    Booking timeline: Popular programs fill six to twelve months in advance, especially for September and October dates. Spring programs (April and May) book more slowly but offer equally good weather and fewer tourists. January and February programs are rare but provide the most intimate experience.

    Fitness requirements: You’ll stand for several hours during cooking classes and walk on uneven surfaces during market and town visits. Most programs involve stairs without elevators. A moderate fitness level suffices, but alert the organizer to mobility limitations.

    Language considerations: Instruction happens in English for international programs. However, market vendors, restaurant staff, and some artisan producers speak only Italian. Your chef or guide translates, but learning basic food vocabulary enriches the experience.

    Tipping customs: Unlike American restaurants, tipping isn’t expected in Italy. However, leaving small amounts for exceptional service is appreciated. For your cooking instructor and villa staff, a group tip of 50 to 100 euros per person for the week is standard but not required.

    Cell phone and internet: Most properties offer WiFi in common areas but not necessarily in guest rooms. Cell service can be spotty in rural locations. Plan for limited connectivity and embrace the digital detox.

    Laundry: Longer programs usually include one laundry service midweek. Otherwise, you’ll hand wash items in your room. Pack quick-dry fabrics and plan to re-wear clothes.

    Why This Week Changes How You Cook at Home

    The real value of a tuscany culinary tour week reveals itself months later. You’ll find yourself shopping differently, asking butchers questions you never considered, and tasting ingredients before adding them to dishes. The recipes matter less than the mindset shift.

    You’ll understand why Tuscan cooks obsess over ingredient quality. When tomatoes taste like sunshine and olive oil burns your throat in the best way, you don’t need complicated techniques. You learn to let ingredients speak and to intervene only when necessary.

    The social aspect lingers too. You’ll stay in touch with fellow participants, sharing recipe modifications and planning reunions. Many programs create private social media groups where alumni post cooking successes, ask questions, and encourage each other to maintain the skills learned during that transformative week in the Tuscan hills.

    Making the Most of Your Culinary Adventure

    Choose your program based on what matters most to you. If wine education ranks high, select an operator with strong vineyard connections. If you want intensive cooking time, look for programs with daily classes rather than heavy excursion schedules. If meeting locals matters more than luxury, choose a working farm over a restored villa.

    Prepare physically by standing while cooking at home in the weeks before your trip. Practice basic knife skills so you can keep pace during classes. Learn a dozen Italian food words, even if you never study the language seriously. These small efforts compound into a richer experience.

    Most importantly, show up ready to participate fully. Put your phone away during classes. Ask questions when you don’t understand. Taste everything, even ingredients you think you dislike. The week passes faster than you expect, and the memories you create will reshape how you think about food, cooking, and what it means to eat well for the rest of your life.